
Dirty optics are trouble. They diminish performance, and in high-energy systems, they can even cause physical damage. Plus, well...they just plain look bad. When faced with an unsightly smudge or bit of dirt, it’s tempting to buff it off with the nearest piece of Kleenex. More likely than not, if you do that, you’re going to end up with a dirty, damaged optic. So, put down that handkerchief. Here are five things you need to know before you touch any optical surface.
1. The Right Environment
To remove all contaminants you have to see all the contaminants. That’s difficult to do in ambient light. For maximum quality control, inspect and clean your optical elements in a dark, dust-free room. Use a good-quality inspection lamp against a dark background to check the optic from all angles. A high-contrast setup ensures that you focus on removing specific contaminants. That is much more efficient than blindly cleaning the whole surface and hoping for the best.
2. The Right Tools
Your cleaning lab should include a “toolbox” of standard items such as optical wipes, lint-free lens cloth, an air blower, and contaminant-free swabs. Powder-free gloves and finger cots are also always a good idea. All of these items are available from optical and laboratory catalogs. Frequently you can even buy a fully stocked optical cleaning kit. Never try to “save money” by using alternate materials. No tissue paper. No shirt tails. No breathing. No blowing. No drugstore cotton swabs. The pennies you save could cost you hundreds of dollars.
3. The Right Information
A single cleaning process does not apply to all optical surfaces. Hardness and brittleness vary among both glass and coating materials. Other considerations include chemical sensitivity, toxicity, and even ambient humidity. Before you touch an optical surface, make sure that you understand the relevant material properties. Damaging a surface that you meant to clean is a grim irony.
4. The Right Procedures
There is a “right way” to clean optics and an infinity of wrong ways. Optical technicians have spent decades developing best-practice cleaning procedures for all optical surfaces. Take advantage of that history of experience. There is no reason to use “trial and error” to develop your procedures from scratch.
5. The Right People
The very best advice for cleaning optics is to hire people who already know how to clean optics. Experienced optical technicians come “pre-packaged” with the knowledge, patience, and discipline to clean optics. They can also train new technicians. If you find a skilled optical technician, hire them. If you have skilled optical technicians, don’t let another company steal them.
Remembering these five points will keep you from inadvertently damaging your optics. Taking shortcuts to “save time” or “save money” will inevitably cost you more time and more money. If you ever have questions or concerns about handling one of our products, call us. We love your business, but we don’t want to have to sell you the same product twice.
Download our Lens & Mirror Cleaning Procedures tip sheet.

**Update**
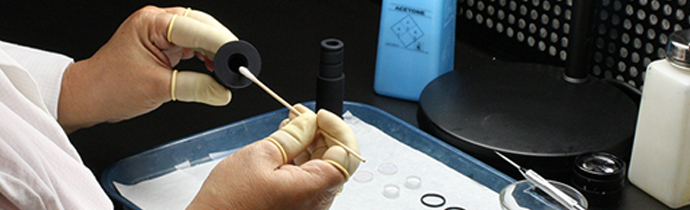
LinkedIn user James Hendrix suggested some additional tips for avoiding particulate and organic contamination based on his experience cleaning laser optics. They refer to the image used at the top of this blog post. They have been edited slightly for clarity.
1) The cotton-tipped applicator seems to have a wooden shaft which can leach resins when exposed to typical cleaning solvents.2) Be sure to cover all fingers with finger cots. (Also, finger cots should be talc-free.)
3) Instead of the polyethylene dop-top bottle shown, choose a bottle material that does not leach plasticizers. The dop-top has a tendency to collect particulates, so clean it often.
4) Though not shown in the photo, solvent grade is critical as well.
When cleaning optics, it is certainly important to keep in mind the properties of both the optical materials and the cleaning materials you are working with, as well as the quality requirements for your particular application. Have suggestions, questions, or concerns? Leave a comment below.
